As I mentioned previously, there was an issue with the baseboards; namely, after installing the new flooring, I placed the baseboards against the walls to see how it all looked. I have had this niggling feeling about it for some time now, so I put a few pieces of furniture into one room and the problem became apparent. To be honest, it would have become an issue no matter what flooring was used. These original baseboards are just plain bulky. As a result, furnishings end up sitting far away from the walls. I want to stay true to the person who built the dollhouse but...it just doesn’t look right. Too much space is lost as a result. I went back online and ordered “seconds” of baseboards from the same person I got the crown from. Speaking of which, I’ll add a resource page when this project is complete. Once I received the new baseboards (which are wavy in some cases - the seller was transparent about this so I expected and anticipated some issues would arise); but, just take a look at the difference in thickness between the two:

The new ones really allow for more space! I measured, cut, and painted. As they dried I moved on to work on the doors and trim. The first problem I encountered came as a result of a “test.” I used a small piece of balsa wood and a door hinge. Trying to place the hinge inside the doorway would result in too large a gap:

So I laid the hinges out over the trim and door, then did another “test” as I didn’t like the look of the hinges. I decided to paint them white to blend in:

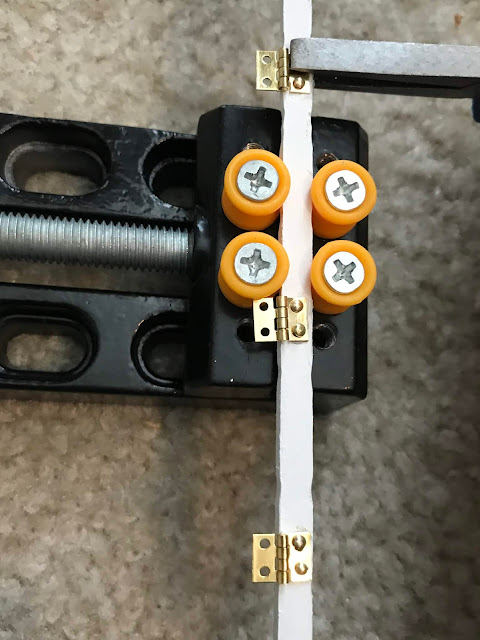
I placed the trim piece in the vise and used my new pin set to drill tiny holes for the nails:

I snipped the bottom of the nails off as they were too long and would have poked through to the other side of the doors/trim:

I then installed three hinges on the door trim:
And repeated the process on the actual door:

I went ahead and installed the “faux” door trim in the rooms where the door would be installed on the opposing side. In the room shown below, I had to install the beadboard along with it. I finished it up by installing the baseboards. These had to be cut down even further once I had all those other elements in place. I also used caulk to fill any gaps:

I moved on to the other room with the coffee stir stick beadboard and repeated, only this time I installed the actual doors. The baseboards required shimming in this one since they were wavy and needed additional help to adhere. Still...it went reasonably well:

The door off the hallway leading into this upper bedroom didn’t have a side wall and so I had to butt a trim piece up against the back of the house:

At this point, a major issue reared its ugly head. I’d read many horror stories about door hinges but I’d been lucky until now. In spite of the fact that the hinges and the nails had been glued in, as I was installing the next door, the hinges literally pulled out, leaving it a mess:

I had a backup plan in place, fortunately, and moved on with a new “test.” Using bias tape, I cut it to fit the interior off a piece of balsa and the exterior section of door trim and glued it in place:

It adhered well and still acted as a full hinge. The doors wouldn’t be quite as strong and they would swing back against their frames since an actual hinge wouldn't be in place, but hey, at least they weren’t as likely to rip out altogether:

Because installation of the doors required simultaneous fittings of baseboards and beadboard, this seemed a good time to add yet another element. I decided to cut the top piece of step off a leftover baseboard and turned it upside down and painted:

Then attached it to the wallpaper in this room which had chair rail detail built in, only now it looked more like real chair rail. So, with the new bias hinged doors, baseboards, and chair rail in place, the end result was this:

From here, I turned the dollhouse upside down and glued a magnet to the center of each room. All of my lights will be attached this way allowing for easier battery operated light changes:

Another issue though. Two of my lights didn’t work and one might be on its way out. I installed the lights but left the two interior hallway lights without for now. I contacted the company I ordered them from to see if they’d honor replacement or if I’d need place another order. They've promised to send me two replacements, but they'll be coming from the UK, so their arrival will take some time.
Below are shots with lights installed (I moved two over from the opposing side just to illustrate how they'll appear once the other lights do arrive). For all intents and purposes, as seen below (with doors shown in various stages of open vs. closed), the inside is done!


I returned to the facades I’d previously cut interior wallpaper templates to fit but hadn't yet glued down. Before gluing them, I used the window cutouts as guides to make window “glass”:

Then pulled out my Yes! Paste and glued the wallpapers into place:


They still need some work, especially in those areas where the seams are very apparent, but I have to glue the actual exterior wallpaper onto the other side first before I start adding embellishments to either side.
While I’m thinking of it, now is an excellent time to make note of another recent purchase, of which I’m in love. I finally broke down and bought a Tabletop Turntable. This allows me to set the turntable on top of any stable surface, place the dollhouse on top, and it will spin the house, making access super easy!

Next up: The Exterior!

The new ones really allow for more space! I measured, cut, and painted. As they dried I moved on to work on the doors and trim. The first problem I encountered came as a result of a “test.” I used a small piece of balsa wood and a door hinge. Trying to place the hinge inside the doorway would result in too large a gap:

So I laid the hinges out over the trim and door, then did another “test” as I didn’t like the look of the hinges. I decided to paint them white to blend in:

I placed the trim piece in the vise and used my new pin set to drill tiny holes for the nails:

I snipped the bottom of the nails off as they were too long and would have poked through to the other side of the doors/trim:

I then installed three hinges on the door trim:

And repeated the process on the actual door:

I went ahead and installed the “faux” door trim in the rooms where the door would be installed on the opposing side. In the room shown below, I had to install the beadboard along with it. I finished it up by installing the baseboards. These had to be cut down even further once I had all those other elements in place. I also used caulk to fill any gaps:

I moved on to the other room with the coffee stir stick beadboard and repeated, only this time I installed the actual doors. The baseboards required shimming in this one since they were wavy and needed additional help to adhere. Still...it went reasonably well:

The door off the hallway leading into this upper bedroom didn’t have a side wall and so I had to butt a trim piece up against the back of the house:

At this point, a major issue reared its ugly head. I’d read many horror stories about door hinges but I’d been lucky until now. In spite of the fact that the hinges and the nails had been glued in, as I was installing the next door, the hinges literally pulled out, leaving it a mess:

I had a backup plan in place, fortunately, and moved on with a new “test.” Using bias tape, I cut it to fit the interior off a piece of balsa and the exterior section of door trim and glued it in place:

It adhered well and still acted as a full hinge. The doors wouldn’t be quite as strong and they would swing back against their frames since an actual hinge wouldn't be in place, but hey, at least they weren’t as likely to rip out altogether:

Because installation of the doors required simultaneous fittings of baseboards and beadboard, this seemed a good time to add yet another element. I decided to cut the top piece of step off a leftover baseboard and turned it upside down and painted:

Then attached it to the wallpaper in this room which had chair rail detail built in, only now it looked more like real chair rail. So, with the new bias hinged doors, baseboards, and chair rail in place, the end result was this:

From here, I turned the dollhouse upside down and glued a magnet to the center of each room. All of my lights will be attached this way allowing for easier battery operated light changes:

Another issue though. Two of my lights didn’t work and one might be on its way out. I installed the lights but left the two interior hallway lights without for now. I contacted the company I ordered them from to see if they’d honor replacement or if I’d need place another order. They've promised to send me two replacements, but they'll be coming from the UK, so their arrival will take some time.
Below are shots with lights installed (I moved two over from the opposing side just to illustrate how they'll appear once the other lights do arrive). For all intents and purposes, as seen below (with doors shown in various stages of open vs. closed), the inside is done!


I returned to the facades I’d previously cut interior wallpaper templates to fit but hadn't yet glued down. Before gluing them, I used the window cutouts as guides to make window “glass”:

Then pulled out my Yes! Paste and glued the wallpapers into place:


They still need some work, especially in those areas where the seams are very apparent, but I have to glue the actual exterior wallpaper onto the other side first before I start adding embellishments to either side.
While I’m thinking of it, now is an excellent time to make note of another recent purchase, of which I’m in love. I finally broke down and bought a Tabletop Turntable. This allows me to set the turntable on top of any stable surface, place the dollhouse on top, and it will spin the house, making access super easy!

Next up: The Exterior!


Comments
Post a Comment