I spent a small portion of yesterday morning pulling electrical, which I didn't bother to document since it was simply turning old screws and pulling and/or snipping wire. Most of my time was utilized deconstructing the trim pieces from the roof, siding, and front and back facades. It took great care as some of the wood was brittle, and in some cases, repair or replacement will be needed. There are also missing trim pieces that need to be made to complete everything once I get to the rebuild portion of this project.
Here you can see an example of how some of the trim has broken:

Also, there are exposed nails and brad nails. I encountered some of this while removing the baseboards on the interior and ended up nicking and poking myself more times than I care to recall. I should have pulled them straight away but I chose to work around them for the sake of expediency. I was on a roll, after all. But I did finally yank them out this time around:


The large roofing detail has been removed. Talk about rusty nails! This piece is going to need a bit of repair prior to putting it back together, for sure!


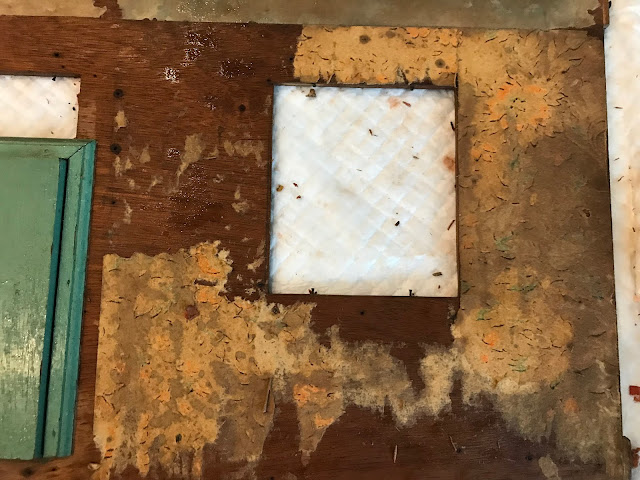
Here's a shot of the exterior siding on one side of the house showing the hazardous nails that remained after the trim was pulled (Yikes, right?!):


But I managed to extract them all!

From there, I pulled the remaining trim and removed all nails/brads. I also had to come up with a system to label all of these items so that I could store them for later and still be able to determine where they go once this all gets reconstructed. Such a process!
Then I moved on to the piece of facade that has four windows (two of which are missing and will need to be replaced). Oh, and guess what? There's wallpaper all over the backside. So I get to take that on again. Yay! On the plus side, it's all flat surfaces now. That bit will come later though. For now, more trim removal:


I left the door in place because I think once the paper is removed and the KILZ primer applied, I'll be able to paint the door without it having any effect on the exterior yet to be re-papered. We will see...

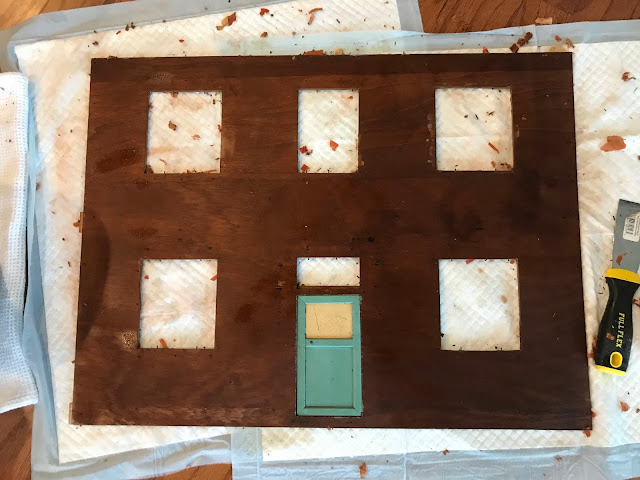
Moving on to the facade with five windows and the door overhang:


I left the door intact on this facade as well:

So much trim, so many little sharp pieces! Some of them flew far and wide whilst snipping, which then required hunting down lest we end up with nails embedded in our feet. Or worse (Here's looking at you tetanus):

Finally, I took to one exterior side of the house to begin paper removal. It's crazy to see the difference between what was hidden under trim such as would be the original paper color vs. that which was exposed to the elements all these years:

The inner paper peeled away like butter, but the outer sections and anything that had been under trim required some light scraping:

Here it is all shiny and new:

That's as far as I got before I had to go pick my daughter up from preschool. She's only there in the morning, so my time must be spent wisely.
The following morning I commenced with the last bit of wallpaper removal on the opposing side of the dollhouse:


Then cleaned the rooftop:


Then to the first facade, both front and back:


And on to the other facade, the last remaining piece:


You can see a little of the wallpaper design on these, if you look closely:

I thought I should also give the rooftop piece a good cleaning as well:


I thought those white spots were bird poop, turns out they were bits of glued paper, and they left a lasting mark:
And a peek under the hood, so to speak:

Looks good, but I wiped it down anyway:

At this stage, I returned to the trim pieces. All of those nails and brads needed to be snipped. Not exactly glamorous work, but better safe than sorry:


Because rusty nails = BAD!

But golly, there were A LOT of pieces:

That's done!
I'm ready for my close-up, Mr. Demille!


I may be at a bit of a standstill here. The next step really needs to entail addressing the trim pieces and woodwork. The dollhouse has to be firmed up and all its pieces, including the missing ones, should ideally be created and properly fit. Once that's complete, I can paint the entire thing with KILZ. This house had the definite scent of musty old mold and while it currently smells more like the lavendar fabric softender contained in my cleaning solution, I still want to prime everything so that it is truly safe for my daughter.
A final comparison of the BEFORE and the AFTER:


Here you can see an example of how some of the trim has broken:

Also, there are exposed nails and brad nails. I encountered some of this while removing the baseboards on the interior and ended up nicking and poking myself more times than I care to recall. I should have pulled them straight away but I chose to work around them for the sake of expediency. I was on a roll, after all. But I did finally yank them out this time around:


The large roofing detail has been removed. Talk about rusty nails! This piece is going to need a bit of repair prior to putting it back together, for sure!


Here's a shot of the exterior siding on one side of the house showing the hazardous nails that remained after the trim was pulled (Yikes, right?!):


But I managed to extract them all!

From there, I pulled the remaining trim and removed all nails/brads. I also had to come up with a system to label all of these items so that I could store them for later and still be able to determine where they go once this all gets reconstructed. Such a process!
Then I moved on to the piece of facade that has four windows (two of which are missing and will need to be replaced). Oh, and guess what? There's wallpaper all over the backside. So I get to take that on again. Yay! On the plus side, it's all flat surfaces now. That bit will come later though. For now, more trim removal:


I left the door in place because I think once the paper is removed and the KILZ primer applied, I'll be able to paint the door without it having any effect on the exterior yet to be re-papered. We will see...

Moving on to the facade with five windows and the door overhang:


I left the door intact on this facade as well:

So much trim, so many little sharp pieces! Some of them flew far and wide whilst snipping, which then required hunting down lest we end up with nails embedded in our feet. Or worse (Here's looking at you tetanus):

Finally, I took to one exterior side of the house to begin paper removal. It's crazy to see the difference between what was hidden under trim such as would be the original paper color vs. that which was exposed to the elements all these years:

The inner paper peeled away like butter, but the outer sections and anything that had been under trim required some light scraping:

Here it is all shiny and new:

That's as far as I got before I had to go pick my daughter up from preschool. She's only there in the morning, so my time must be spent wisely.
The following morning I commenced with the last bit of wallpaper removal on the opposing side of the dollhouse:


Then cleaned the rooftop:


Then to the first facade, both front and back:


And on to the other facade, the last remaining piece:


You can see a little of the wallpaper design on these, if you look closely:


I thought I should also give the rooftop piece a good cleaning as well:


I thought those white spots were bird poop, turns out they were bits of glued paper, and they left a lasting mark:
And a peek under the hood, so to speak:

Looks good, but I wiped it down anyway:

At this stage, I returned to the trim pieces. All of those nails and brads needed to be snipped. Not exactly glamorous work, but better safe than sorry:


Because rusty nails = BAD!

But golly, there were A LOT of pieces:

That's done!
I'm ready for my close-up, Mr. Demille!


I may be at a bit of a standstill here. The next step really needs to entail addressing the trim pieces and woodwork. The dollhouse has to be firmed up and all its pieces, including the missing ones, should ideally be created and properly fit. Once that's complete, I can paint the entire thing with KILZ. This house had the definite scent of musty old mold and while it currently smells more like the lavendar fabric softender contained in my cleaning solution, I still want to prime everything so that it is truly safe for my daughter.
A final comparison of the BEFORE and the AFTER:


Comments
Post a Comment