The Hobbies dollhouse is currently under its third glue and clamp, of which there are many more to come, but in the meantime, it turns out this house had yet another surprise in store for me. More on that in a bit.
While it's been undergoing its first round of structural repair:

I've done my best to stay busy. There's been a lot of trips to the hardware store and scouring the Internet in search of the pieces needed to make this dollhouse structurally sound again. As much as I want to get to the truly fun part, making it safe is my number one priority and I refuse to move forward until I feel confident there aren't going to be nail jabs and splinters when my daughter is playing around within its walls.
So, yes. There's been plenty of measuring and searching. We found what we believe will be useful in making the various missing or broken pieces of external trim. For the missing baseboards my husband is hopeful to be able to recreate those where needed. Because they were obviously handmade and can't be found for purchase. Naturally. I've had to purchase stripwood for that, in the correct size, and that's being mailed to me. I also decided, because there are such gaps between the walls and ceiling that are doubtful to be totally fixed during the structural repair, I'm considering adding crown molding. I purchased some 2nd's off of Ebay and I can only cross my fingers they aren't too wavy or warped to be useful.
In addition, I contacted a wonderful man named Glen from http://www.rrstoneworks.com/ whom I'd reached out to months ago to inquire about the missing windows and interior doors. This is a company that deals primarily in garden railroad hobbyists, and though he primarily works with styrene plastic, he's agreed to make an attempt at customizing interior doors for me, and after mailing templates for the windows, he'll cut those out of plywood as well. I'm very much looking forward to seeing how all of that turns out, but he too must now go on a hunt for wood before he can take it on. It may be quite some time before I see the end result of that particular part of this project.
Rather than cool my heels completely, I set about making some DIY shutters to give the exterior some additional character (keep in mind that there are 9 windows on the facades of the dollhouse):


And finally, painted and glued:

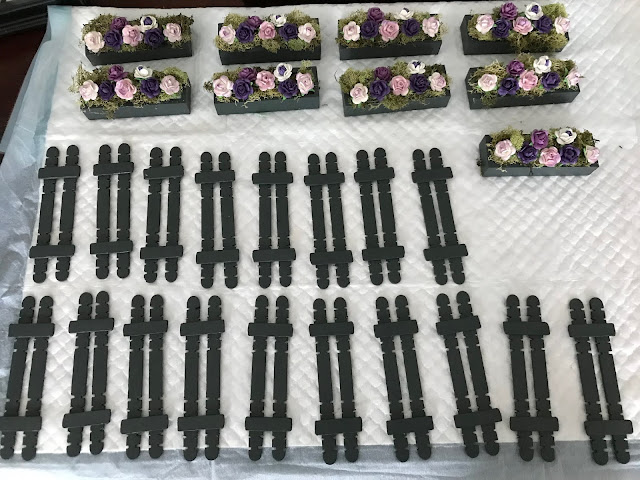
I've also had it in the back of my mind to make some flowering window boxes, which you can see here (along with the underside of the shutters as they're in the process of drying):


And here is a shot of everything after completion:
It seems fitting to me on a house that was handmade to continue with that notion wherever I can, so I'm really hopeful that these work out. I'm still guessing at the things I'm taking on. I'm aware that some of the ideas I've had may not work out though for any number of unforseen reasons. We can only wait and see whether or not these ultimately fit with the end product.
Now, getting back to my earlier statement that the house held yet another surprise for me.
It came about because I'd started to make paper templates of the interior in the hope of getting a better gauge on wallpaper needs. That's when I ran into this roadblock:

One of these exists on every outer wall with the exception of two lower rooms. Wallpaper removal was difficult because of them, but I honestly didn't give them a whole lot of thought prior to this moment. I suppose I understood they likely had something to do with electrical, but at the forefront, I sort of imagined they'd been installed to give the appearance of a chimney effect. I was also aware that, due to the fact that they jut out into the rooms as they do, it would make furniture placement somewhat limited or even awkward. But that was just something I accepted. At the time.
Anywho, notice the way they are rounded on the sides? Well, that presents a problem when it comes to wallpaper. I'm already a bit nervous about getting the wallpaper right, you see, as I've not really ever done it. I have this feeling its going to be this messy and frustrating process, so the very idea of some structure making it even more troublesome doesn't sit well with me.
It was at this point that I pulled out a screwdriver and with much force, began twisting the rusty screws. Believe it or not, I never even noticed the screws before. I really did think these areas were structurally necessary. Turns out, they aren't:

I mean, they could be necessary if I wanted to continue with the electrical as it had been set up previously. But that isn't my goal. So yeah, not technically necessary. They are in no way tied to anything external either. Bonus: I can pull the remaining electrical and remove the additional wallpaper I had no clue existed underneath.
Bigger bonus? I get to remove the nasty mold that was hiding out under there. Eeeew!

If I'd left them, this dollhouse never would have been as safe as I wanted it. And I'd have had no idea!
Something else that was interesting. There was a visible pattern on the underside of one of them:

Here's a close-up after removal:

It's backing was a burlap type of material:

Speaking of which, now I'd have to remove even more wallpaper. Again. Party!
Please excuse the lighting in these. It was getting on in the evening:


As a result of this, I'm leaning more and more toward thinking the original constructor of this dollhouse might have done so in a time period closer to when the plans came out in the 1950's. Notice the red painted room in the shot above and the fact that there was wallpaper under that panel. Under that is wood, just as with the rest of the house prior to papering:

I think perhaps someone who later inherited the dollhouse added the electrical and then those panels. There was no wallpaper on the red painted room when I took to cleaning it. Only now was I coming across that. And it's all so clearly dated vs. some of the scattered and out of scale strawberry paper I had to remove. As they say, "If these walls could talk!"
A last look now that all the panels have been removed, thus creating more interior room:


They're going to be slightly easier to wallpaper and I do have the extra room in there, which will definitely make furnishing it less challenging. Buuuuuuut, it presents a new problem. Whereas before we only had a couple small pieces of missing baseboard to try to recreate, we now have six entire wall lengths to take on.
Off to search for more stripwood!
While it's been undergoing its first round of structural repair:

I've done my best to stay busy. There's been a lot of trips to the hardware store and scouring the Internet in search of the pieces needed to make this dollhouse structurally sound again. As much as I want to get to the truly fun part, making it safe is my number one priority and I refuse to move forward until I feel confident there aren't going to be nail jabs and splinters when my daughter is playing around within its walls.
So, yes. There's been plenty of measuring and searching. We found what we believe will be useful in making the various missing or broken pieces of external trim. For the missing baseboards my husband is hopeful to be able to recreate those where needed. Because they were obviously handmade and can't be found for purchase. Naturally. I've had to purchase stripwood for that, in the correct size, and that's being mailed to me. I also decided, because there are such gaps between the walls and ceiling that are doubtful to be totally fixed during the structural repair, I'm considering adding crown molding. I purchased some 2nd's off of Ebay and I can only cross my fingers they aren't too wavy or warped to be useful.
In addition, I contacted a wonderful man named Glen from http://www.rrstoneworks.com/ whom I'd reached out to months ago to inquire about the missing windows and interior doors. This is a company that deals primarily in garden railroad hobbyists, and though he primarily works with styrene plastic, he's agreed to make an attempt at customizing interior doors for me, and after mailing templates for the windows, he'll cut those out of plywood as well. I'm very much looking forward to seeing how all of that turns out, but he too must now go on a hunt for wood before he can take it on. It may be quite some time before I see the end result of that particular part of this project.
Rather than cool my heels completely, I set about making some DIY shutters to give the exterior some additional character (keep in mind that there are 9 windows on the facades of the dollhouse):

And a close-up of the idea I was going for:

And finally, painted and glued:

I've also had it in the back of my mind to make some flowering window boxes, which you can see here (along with the underside of the shutters as they're in the process of drying):

Here they are with the first coat of paint on the underside:

And fully painted (I went with three coats, just to be safe. I could have gotten away with two, I think, but in the interest of longevity, I added another for good measure):


It seems fitting to me on a house that was handmade to continue with that notion wherever I can, so I'm really hopeful that these work out. I'm still guessing at the things I'm taking on. I'm aware that some of the ideas I've had may not work out though for any number of unforseen reasons. We can only wait and see whether or not these ultimately fit with the end product.
Now, getting back to my earlier statement that the house held yet another surprise for me.
It came about because I'd started to make paper templates of the interior in the hope of getting a better gauge on wallpaper needs. That's when I ran into this roadblock:

One of these exists on every outer wall with the exception of two lower rooms. Wallpaper removal was difficult because of them, but I honestly didn't give them a whole lot of thought prior to this moment. I suppose I understood they likely had something to do with electrical, but at the forefront, I sort of imagined they'd been installed to give the appearance of a chimney effect. I was also aware that, due to the fact that they jut out into the rooms as they do, it would make furniture placement somewhat limited or even awkward. But that was just something I accepted. At the time.
Anywho, notice the way they are rounded on the sides? Well, that presents a problem when it comes to wallpaper. I'm already a bit nervous about getting the wallpaper right, you see, as I've not really ever done it. I have this feeling its going to be this messy and frustrating process, so the very idea of some structure making it even more troublesome doesn't sit well with me.
It was at this point that I pulled out a screwdriver and with much force, began twisting the rusty screws. Believe it or not, I never even noticed the screws before. I really did think these areas were structurally necessary. Turns out, they aren't:

I mean, they could be necessary if I wanted to continue with the electrical as it had been set up previously. But that isn't my goal. So yeah, not technically necessary. They are in no way tied to anything external either. Bonus: I can pull the remaining electrical and remove the additional wallpaper I had no clue existed underneath.
Bigger bonus? I get to remove the nasty mold that was hiding out under there. Eeeew!

If I'd left them, this dollhouse never would have been as safe as I wanted it. And I'd have had no idea!
Something else that was interesting. There was a visible pattern on the underside of one of them:

Here's a close-up after removal:

It's backing was a burlap type of material:

Speaking of which, now I'd have to remove even more wallpaper. Again. Party!
Please excuse the lighting in these. It was getting on in the evening:


As a result of this, I'm leaning more and more toward thinking the original constructor of this dollhouse might have done so in a time period closer to when the plans came out in the 1950's. Notice the red painted room in the shot above and the fact that there was wallpaper under that panel. Under that is wood, just as with the rest of the house prior to papering:

I think perhaps someone who later inherited the dollhouse added the electrical and then those panels. There was no wallpaper on the red painted room when I took to cleaning it. Only now was I coming across that. And it's all so clearly dated vs. some of the scattered and out of scale strawberry paper I had to remove. As they say, "If these walls could talk!"
A last look now that all the panels have been removed, thus creating more interior room:


They're going to be slightly easier to wallpaper and I do have the extra room in there, which will definitely make furnishing it less challenging. Buuuuuuut, it presents a new problem. Whereas before we only had a couple small pieces of missing baseboard to try to recreate, we now have six entire wall lengths to take on.
Off to search for more stripwood!


Comments
Post a Comment