The filler mixture on my "test" piece dried up nicely, I think:
I went ahead and made flooring templates for all the rooms out of the cardstock I’ll paste the strips onto. This second time around though, I proceeded by marking and cutting out a piece of the flooring to the size I want to use, but pasted it to a separate sample piece of the earlier thick hardwood plank so that when turned upside down and butted up against the new plank, it gives me a more accurate strip when cutting:


This method has been simpler so far. Once they were cut and laid out, I made certain they fit snuggly inside the room I was working on, in this example case, what will be the laundry, and then I glued the planks to the cardstock:

Added the sharpie "nail holes":

Followed by the spackle filler mixture:

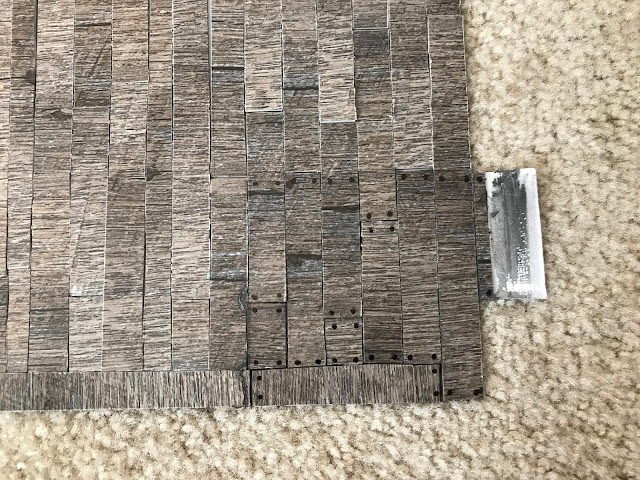
Wiped clean:


I went ahead and made flooring templates for all the rooms out of the cardstock I’ll paste the strips onto. This second time around though, I proceeded by marking and cutting out a piece of the flooring to the size I want to use, but pasted it to a separate sample piece of the earlier thick hardwood plank so that when turned upside down and butted up against the new plank, it gives me a more accurate strip when cutting:


Also, I've decided not to use such a random pattern. It leaves too much room for error and let's face it, frustration! This time, I marked and cut with the grain! I mean, there's an arrow, folks! How did I miss that the first go around?

This method has been simpler so far. Once they were cut and laid out, I made certain they fit snuggly inside the room I was working on, in this example case, what will be the laundry, and then I glued the planks to the cardstock:

Added the sharpie "nail holes":

Followed by the spackle filler mixture:

Wiped clean:

Settled it in the dollhouse to ensure it still fit properly, and then laid out some double-sided tape. I hope I never have to remove it and add something new, but this will make it easier, especially if the pieces start coming unglued. Over the course of this project, whether it be paper, flooring, siding, or shingle, I've read a lot of folks have had various issues with adhesives. Choosing the right one must have a great deal to do with the climate or method of installation. Only time will tell as far as this goes! But once installed, it looked like this:

An interesting aside: I snapped a picture of the new flooring vs. the hardwood paper I'd originally planned to use:

Personally, I'm very happy I took the time to think this through. The process was extremely labor intensive, and believe me, I've discovered joints and muscles in my fingers, hands, and forearms that I never knew existed, but the final result, so far, makes me feel good about this choice.
While I was working on the flooring my hands needed some downtime and so I would switch back and forth between that task and prepping the crown molding, beadboard, as well as beginning to make templates and cut out papers to lay over the interior facades that line up with their corresponding interior rooms:

I'm disappointed but, in every single case, I did not have enough paper to accomplish this cleanly. It's going to be hodgepodged together, but I'll do my best to figure out some way to make the end result look at least somewhat presentable. I hope:

Once I cut the crown molding and ensured the chair rail had properly adhered to the beadboard, I started to prime and paint. Here they are after the very first coat of primer:

As previously mentioned the dollhouse does have some structural issues in that not all of the walls and ceilings and floors are plumb and therefore won't allow for accurate measurements. Even once I'd done what I could to glue and nail and clamp it early on, this problem, while somewhat better, remained. If wallpapering didn't present with issues as a result, installing the crown molding most certainly did. I turned the dollhouse upside down in the hope that gravity would give me an assist (also, one of the reasons I left the exterior work for last - too much need for flipping it about which would risk damaging the exterior surfaces). Installing the crown molding ultimately required applying shims just to get some of them to adhere:


There weren't just the places where the crown didn't line up exactly in the corners, but also gaps where it didn't quite adhere to the ceiling or lower wallpaper:

I filled a syringe with caulk:

And went to work on those issues:

But I think it paid off:

Here's another example:


After all of the crown molding and flooring was installed, here's where we are:


The next post will most likely cover the installation of the beadboard, which, because I didn't initially order enough and it ultimately ended up being utilized in the laundry since it was a smaller room, I handmade them out of coffee stir sticks to save on cost. I still have enough chair rail left over, fortunately:

I'm also working on priming and painting the doors and trim (I haven't cut the trim pieces as yet):

The installation of the beadboard, doors/trim, as well as the baseboards sort of have to happen in tandem in order to make sure they're cut and lined up to provide enough space for each piece. There also may be a new issue with the baseboards.
But I'll get to all of that next time!


Comments
Post a Comment